The difference between a “home movie” and a piece of “cinema” isn’t found in the price of the camera or the resolution of the sensor. It is found in the intentionality of the four edges of the screen. Most novice creators treat the frame as a passive container—a bucket to hold whatever the camera happens to be pointed at. But for the master cinematographer, the frame is an active, aggressive tool of manipulation.
A frame isn’t just a border; it’s a window into a character’s soul. It is the director’s strongest silent tool, capable of whispering secrets, shouting warnings, or trapping a character in a visual prison before a single line of dialogue is spoken. At Cinemastery Academy, we believe that to master the lens, you must first master the rectangle.
In this comprehensive guide, we will move beyond the basic “how-to” and dive into the “why.” We will explore the technical specifications of lens compression, the psychological warfare of camera angles, and the sacred workflows used by Hollywood’s elite to turn a flat image into a visceral, three-dimensional experience.
Key Takeaways
- Framing vs. Composition: Understanding the distinction between selecting reality and arranging it.
- The Psychological “Why”: How specific angles and ratios trigger subconscious emotional responses in your audience.
- Advanced Internal Framing: Moving beyond doors and windows to master complex sub-framing.
- Technical Synergy: How lens choice and aspect ratios dictate the “breath” of your frame.
- On-Set Troubleshooting: Avoiding the amateur mistakes that kill visual depth.
Table of Contents
- The Foundational Geometry
- Internal Framing: The “Frame Within a Frame” Masterclass
- The Psychology of the Frame
- Technical Specs: Lenses and Aspect Ratios
- Advanced Concepts: Movement and Depth
- Expert “On-Set” Secrets from Cinemastery Academy
- Troubleshooting: Common Framing Fails
- Conclusion
- FAQ
II. The Foundational Geometry
Before you can break the rules of cinema, you must understand the mathematical bones upon which every great shot is built. Geometry in filmmaking isn’t just about math; it’s about guiding the human eye through a structured narrative path.
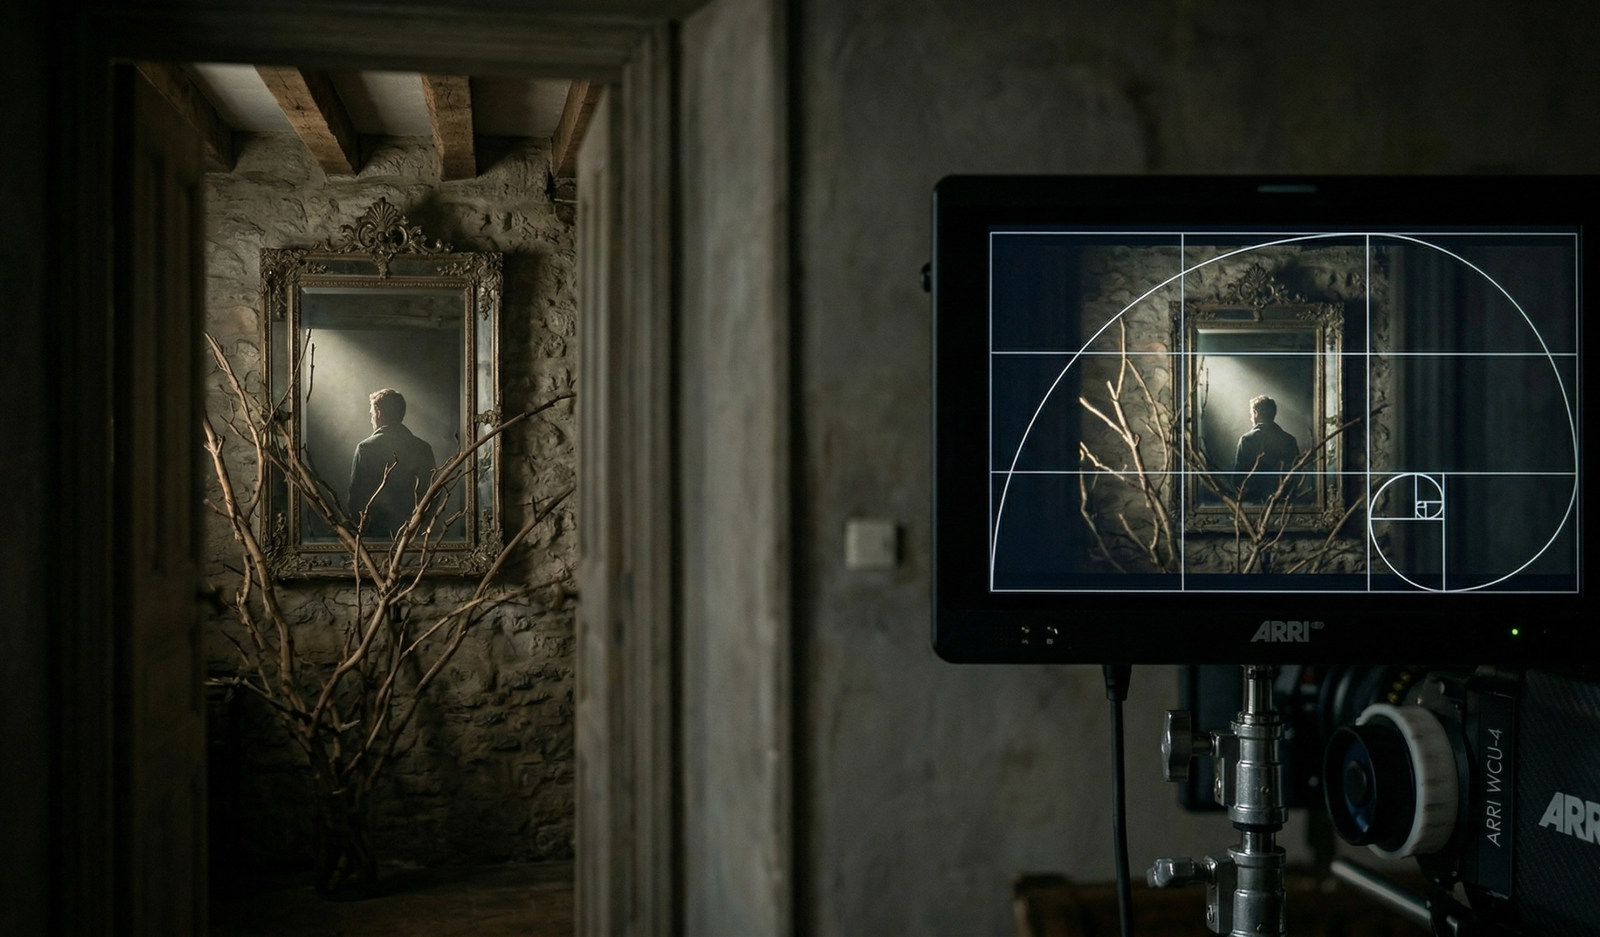
1. The Rule of Thirds vs. The Golden Ratio
The Rule of Thirds is the most common starting point for filmmakers. By dividing the frame into a 3×3 grid, you place your subject on the intersections to create a sense of balance and “room to breathe.” However, at the professional level, we often look to the Golden Ratio (or the Fibonacci Spiral).
While the Rule of Thirds is about balance, the Golden Ratio is about natural aesthetic flow. It mimics the proportions found in nature—from snail shells to galaxies. When you frame a subject using the Golden Ratio, the viewer’s eye follows a curved path toward the focal point, creating a shot that feels “inevitable” and harmonious rather than merely organized.
2. Symmetrical Framing and the “Wes Anderson” Effect
Symmetry is often discouraged in traditional photography as being “too static,” but in cinematography, it is a powerful weapon. Directors like Wes Anderson and Stanley Kubrick use center-weighted symmetry to create a sense of order, divinity, or, conversely, intense discomfort.
By placing a subject dead center, you demand the audience’s undivided attention. It can make a character feel powerful (like a king on a throne) or trapped (like a specimen under a microscope). Use symmetry when the scene requires a “theatrical” or “unreal” quality.
3. Leading Lines: The Visual Roadmap
Your frame should never be a static image; it should be a journey. Leading lines are architectural or environmental lines (roads, hallways, power lines, or even shadows) that point directly to your subject. These lines “force” the viewer’s eye to land exactly where you want it. In the world of high-end cinematography, leading lines are used to create depth and to ensure that even in a chaotic wide shot, the protagonist remains the visual anchor.
III. Internal Framing: The “Frame Within a Frame” Masterclass
The “frame within a frame” (sub-framing) is a hallmark of sophisticated visual storytelling. It adds layers of meaning and three-dimensional depth to a two-dimensional medium. While competitors might tell you to “shoot through a doorway,” we identify six distinct sub-types that every master must know.
1. Architectural Sub-Framing
Using doorways, windows, and hallways is the classic approach. This technique creates a sense of voyeurism. When we see a character through a window, we are no longer just watching them; we are “peeping” on them. It suggests secrets and creates a barrier between the audience and the character’s world.
2. Organic and Natural Frames
Don’t just look for man-made structures. Use foliage, branches, or rock formations to “soften” the edges of your digital image. This is a favorite technique of Emmanuel Lubezki in films like The Revenant. Natural framing helps ground the story in a specific environment and can make the viewer feel like they are hiding in the brush, watching the scene unfold.
3. Reflections and Mirrors
The psychology of the “dual self” is best represented through mirrors. Using a mirror to frame a subject allows you to show two sides of a character—literally and metaphorically. It’s a tool for internal conflict, showing the face they present to the world versus the face they see in the glass.
4. Shadow and Light (Chiaroscuro)
Negative space isn’t empty; it’s a structural element. By using high-contrast lighting—a technique known as Chiaroscuro—you can use darkness to “carve out” a frame for your subject. A character standing in a pool of light surrounded by pitch black is effectively framed by the shadows themselves.
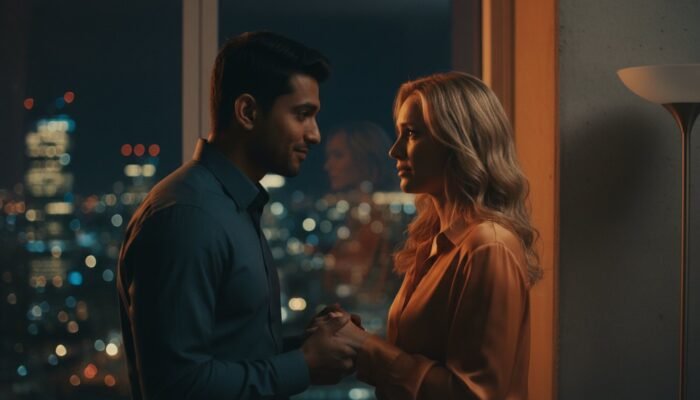
5. Human Framing (The OTS Shot)
The Over-The-Shoulder (OTS) shot is the most common form of human framing. By using the out-of-focus shoulder of one character to frame the face of another, you establish geography and intimacy. It reminds the audience of the physical relationship between the two speakers, pulling them into the conversation.
IV. The Psychology of the Frame
In cinema, size communicates importance. This is the concept of Aesthetic Energy. The way you position your camera in relation to your subject dictates the audience’s emotional state before the actors even speak their lines.
- High Angles vs. Low Angles: A low angle (looking up) grants the subject authority, power, and a “larger-than-life” status. Conversely, a high angle (looking down) strips power away, making the character appear vulnerable, small, or insignificant.
- The Dutch Angle: By tilting the horizon line, you signal that something is “wrong.” The Dutch Angle is a psychological trigger for instability, madness, or impending disaster. It disorients the viewer’s internal equilibrium, mirroring the character’s mental state.
- Negative Space and Isolation: If you place a tiny subject in a massive, empty frame, you communicate loneliness without a word of dialogue. This use of “negative space” is a staple in modern sci-fi and psychological thrillers to emphasize the insignificance of the individual against the vastness of the universe.
V. Technical Specs: Lenses and Aspect Ratios
Framing doesn’t happen in a vacuum; it is dictated by the glass on the front of your camera and the dimensions of your final output.
1. Lens Selection: The Emotional Profile of Focal Lengths
- Wide-Angle (16mm-24mm): These lenses provide environmental context. Because they have a deep depth of field, they keep the subject and their world in sharp focus. However, they also “distort” the frame, making things close to the lens appear unnaturally large—creating a sense of “intimacy” or “grotesqueness.”
- Long-Lens/Telephoto (85mm+): These lenses are the masters of lens compression. They pull the background closer to the subject, “flattening” the image and isolating the subject from the world. This creates a beautiful, creamy bokeh (background blur) that forces the audience to focus purely on the character’s emotions.
2. Aspect Ratios as a Frame
The shape of your canvas matters.
- 2.39:1 (Anamorphic/Widescreen): Perfect for epic landscapes and ensemble casts. It emphasizes the horizontal plane.
- 4:3 (Academy Ratio): This “square” ratio is making a massive comeback in character-driven cinema. It feels claustrophobic, intimate, and focuses entirely on the verticality of the human face.
Are you struggling to choose the right gear for your vision? Companies like ARRI and RED Digital Cinema provide the professional tools, but it is your eye that defines the shot.
VI. Advanced Concepts: Movement and Depth
Masterful framing is rarely static. In cinema, the frame is a living, breathing entity that evolves over the course of a shot.
1. The Snorricam and Subject-Locked Framing
The Snorricam is a camera rig attached to the actor’s body. The result? The subject stays perfectly centered and stationary while the entire world moves around them. This creates a “disoriented” POV that is incredibly effective for scenes involving drug use, panic attacks, or intense psychological stress.
2. Depth of Field Manipulation (Rack Focus)
A Rack Focus is a way to re-frame the story without moving the camera. By shifting the focus from a foreground object to a background subject, you are telling the audience: “Stop looking at this; look at that.” It is a narrative pivot that re-contextualizes the frame in real-time.
3. Dynamic Re-framing
Great cinematographers “follow the action” through subtle pans and tilts. This is called dynamic re-framing. If a character sits down, the camera tilts with them to maintain the “Golden Mean” of headroom. This keeps the frame feeling balanced even during movement.
VII. Expert “On-Set” Secrets from Cinemastery Academy
Here is the “sacred workflow” we teach our students at Cinemastery Academy—the practical, boots-on-the-ground tips that separate the pros from the amateurs.
- The “Dirty” Frame: Never be afraid to “dirty” your frame by putting an out-of-focus object (a lamp, a leaf, a person’s shoulder) in the extreme foreground. This creates a 3D parallax effect that makes the image feel immersive.
- The Rule of Odds: Humans find odd numbers more visually interesting than even ones. If you are framing a group, three people will almost always look more dynamic and “natural” than two or four.
- Mind the Headroom: Amateurs often leave too much space above the head, making the character look like they are “sinking” out of the frame. Professionals aim for the “Golden Mean”—enough space to feel natural, but not so much that the frame feels top-heavy.
- Lead Room (Nose Room): If a character is looking to the left, they should be positioned on the right side of the frame. This gives them “room to look into.” If you “dead-side” them (place them on the left looking at the edge), it creates an immediate sense of tension and unease.
- Color Framing: Use color to balance your composition. If your subject is in a drab, monochromatic environment, place a small splash of a primary color in one corner. This “visual weight” balances the frame and prevents it from feeling lopsided.
VIII. Troubleshooting: Common Framing Fails
Even with the best intentions, certain “framing traps” can ruin an otherwise perfect shot.
- The “Tree Head” Trap: This occurs when a background element (a tree, a pole, or a lamp) appears to be growing directly out of your subject’s head. Always check your background before hitting record.
- Tangents: A tangent is when the edge of your subject perfectly touches the edge of the frame or another object. This creates a weird visual “stickiness” that draws the eye away from the action. Ensure there is either a clear overlap or clear space.
- The Flat Frame: If you don’t have a distinct foreground, middle ground, and background, your frame will look flat and “video-like.” Use layers to create the illusion of depth.
IX. Conclusion
Framing is more than just a technical requirement of filmmaking; it is the language of the subconscious. Every choice you make—the lens you choose, the lines you emphasize, and the space you leave empty—tells the audience how to feel.
The journey to mastery doesn’t happen overnight. It requires a relentless eye and a commitment to the craft. The next time you watch a film, hit “pause” on a frame that moves you. Identify the sub-frame, the leading lines, and the lens choice. Reverse-engineer the magic until it becomes your second nature.
Ready to master the art of the lens?
If you are tired of mediocre results and are ready to forge your own cinematic vision, it’s time to step into a larger world. At Cinemastery Academy, we don’t just teach you how to use a camera; we teach you how to see. Our Advanced Cinematography course is designed to take you from a hobbyist to a professional with a unique, visceral voice.
Start your journey at Cinemastery Academy and transform your vision into professional cinema today.
X. FAQ
1. What is the “Frame within a Frame” technique?
It is a compositional technique where the cinematographer uses elements within the scene (like a window, a doorway, or foliage) to create a secondary frame around the subject. This adds depth, layers of meaning, and a sense of voyeurism to the shot.
2. How do I choose the right lens for framing?
Lens choice depends on the emotional goal. Use wide-angle lenses (below 35mm) to show the relationship between a character and their environment. Use telephoto lenses (85mm and above) to isolate a character and focus on their internal emotional state through lens compression.
3. Why is negative space important in composition?
Negative space provides “breathing room” for the viewer’s eye. It can also be used narratively to emphasize a character’s isolation, loneliness, or the overwhelming scale of their surroundings.
4. Can I fix bad framing in post-production?
While you can “punch in” or crop a shot in post-production, it often comes at the cost of resolution and image quality. Furthermore, you cannot change the perspective or lens compression after the fact. It is always best to “get it right in the glass.”
5. What is the difference between composition and framing?
Composition is the general arrangement of all elements within the scene (actors, props, lighting). Framing is the specific act of using the camera’s edges to select what the audience sees and what is excluded from their view.