The vision is electric in your mind. The rhythm, the emotion, the perfect cut… but on screen, your hands can’t keep up. Every click of the mouse is a broken promise, a stutter in your creative sentence, pulling you from the story and back into the cold mechanics of the software. This is the chasm that separates the technician from the artist. But bridging it isn’t about memorizing a sterile list of every command. It’s about mastering a core set of premiere pro keyboard shortcuts that act as a direct extension of your creative will.
Forget the endless, intimidating charts. We are not here to overwhelm you; we are here to empower you. This guide strips away the noise to reveal the vital commands that transform editing from a battle against the timeline into a fluid, intuitive dance. You will learn to move with speed and precision, to make the software disappear so that only your story remains. It’s time to stop clicking and start creating. It’s time to achieve true creative flow.
Key Takeaways
- Go beyond mechanical clicking and learn to “speak” the language of the timeline, transforming your editing into an intuitive, rhythmic act of creation.
- Master a foundational set of premiere pro keyboard shietcuts designed for raw speed, allowing you to assemble the chaos of your footage into a coherent story with unparalleled efficiency.
- Discover the specific trimming and fine-tuning commands that give your edit a soul, enabling you to make precise, frame-perfect adjustments that elevate the emotional impact of your film.
- Learn how to forge your own path by customizing your keyboard layout, shaping Premiere Pro into a perfect extension of your creative mind for ultimate flow.
Table of Contents
- Why Shortcuts are the Language of the Master Editor
- The Foundation: 15 Core Shortcuts to Command Your Timeline
- Assembling the Chaos: Shortcuts for the Rough Cut
- Refining the Harmony: Advanced Trimming & Fine-Tuning
- Forging Your Own Path: Customizing Your Keyboard
Why Shortcuts are the Language of the Master Editor
To master the art of editing is to move beyond the cold mechanics of the software. It’s about learning to speak the language of the timeline fluently, where every cut, every transition, every audio cue is a word in a visceral conversation with your audience. Mastering a powerful tool like Adobe Premiere Pro isn’t about knowing where the buttons are; it’s about making the tool itself disappear. This is the realm of the keyboard shortcut-the key to unlocking a state of pure creative flow, where your keyboard is no longer a device but a direct extension of your artistic will.
Think of editing as a rhythm. The story has a pulse, a beat that you, the editor, must find and amplify. Every time you reach for the mouse, you break that rhythm. The hunt for a menu, the drag of a cursor-it’s a pause, a moment of hesitation that pulls you out of the story. Shortcuts are the beat. They are the percussive, immediate actions that translate creative impulse directly into reality on the timeline, without delay, without distraction.
The Battle Against the Click
The constant, frantic movement of the mouse is a war against your focus. Each click and drag is a micro-interruption, a tiny tear in the fabric of your concentration. These wasted seconds bleed into minutes, then hours, stolen from your project and your art. By building muscle memory, you free your conscious mind to live inside the story, not inside the software.
Editing with Intention, Not Reaction
A novice editor reacts to the timeline. A master anticipates it. This is where mastering premiere pro keyboard shietcuts transforms you. Shortcuts forge a seamless connection between your brain, your hands, and your footage, allowing you to think three moves ahead. It is the fundamental shift from being a mere software operator to becoming a true artist, one who sculpts time with purpose and vision.
The Foundation: 15 Core Shortcuts to Command Your Timeline
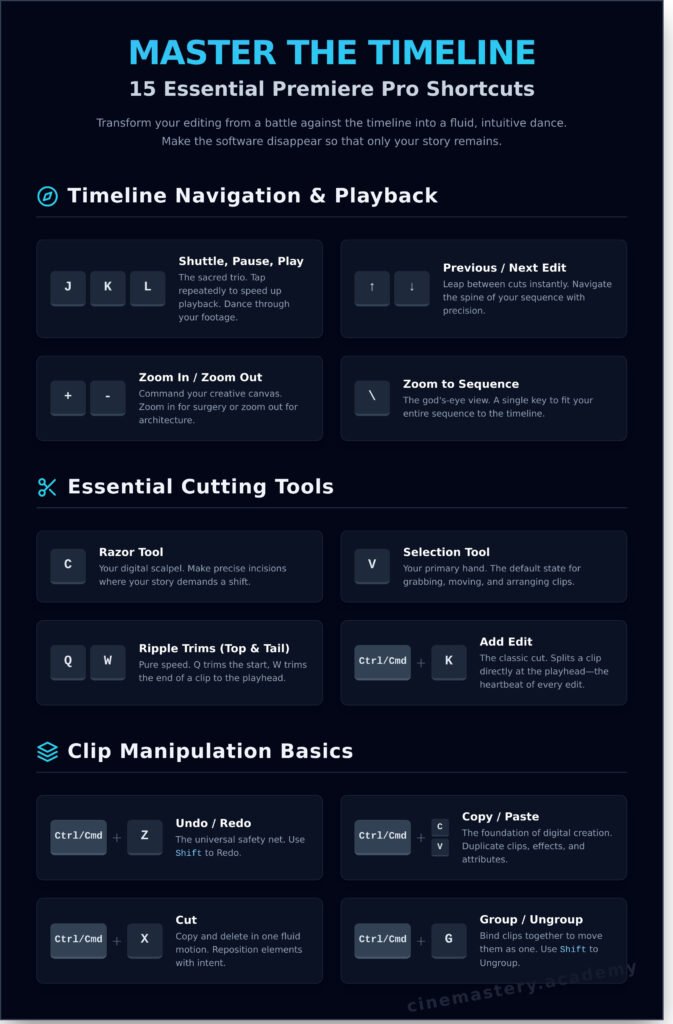
Before you can paint a masterpiece, you must first learn to hold the brush. These 15 commands are your brushstrokes, the fundamental vocabulary of the edit suite. They are the first set of premiere pro keyboard shietcuts you must commit to muscle memory. Forget complex macros and custom layouts for now. These are the keys that govern your timeline, manipulate time itself, and turn raw chaos into narrative harmony. Print this list. Tape it to your monitor. Live by it until these actions become an extension of your creative will.
Timeline Navigation & Playback
This is how you move through your creation. It’s how you find the rhythm of your story, feeling every beat and every pause as you glide through the footage. To edit with instinct, you must first navigate with intuition.
- J, K, L: The sacred trio. J shuttles backward, K pauses, and L plays forward. Tap them repeatedly to increase speed. This is how you dance through your footage, not just watch it.
- Up/Down Arrow Keys: Leap between edits. Instantly jump from one cut to the next, navigating the spine of your sequence with absolute precision.
- + and – Keys: Command your creative canvas. Zoom in for microscopic surgery on an audio waveform or zoom out to see the grand architecture of your entire act.
- \ (Backslash): The god’s-eye view. This single key fits your entire sequence to the timeline, giving you immediate, powerful perspective in an instant.
The Essential Cutting Tools
Here, you become the sculptor. Every key press is a chisel striking stone, carving away the unnecessary to reveal the essential truth of your narrative. These are not just tools; they are instruments of pacing and emotion.
- C for the Razor Tool: Your digital scalpel. Select it to make precise incisions exactly where your story demands a shift in energy, perspective, or time.
- V for the Selection Tool: Your primary hand in the digital realm. This is your default state, used to grab, move, and arrange the building blocks of your film.
- Q and W for Ripple Trims: The secret to an explosive rough cut. Q trims the “top” (the beginning) of a clip to the playhead, and W trims the “tail” (the end), rippling the entire timeline. This is pure, unadulterated speed.
- Cmd/Ctrl + K to Add Edit: The classic cut. This command splits a clip directly at the playhead-the foundational heartbeat of every edit. While these defaults are powerful, the Official Adobe shortcut list is your ultimate reference for the entire command set.
Clip Manipulation Basics
These are the universal laws of creation and revision in the digital world, applied to the art of filmmaking. They provide the freedom to build, experiment, and correct course without penalty.
- Cmd/Ctrl + C & V: The universal language of copy and paste. Replicate clips, effects, and keyframe attributes instantly.
- Cmd/Ctrl + Z: Your safety net. This is your permission to experiment, to be bold, and to reverse any decision that doesn’t serve the film. Use it without fear.
- Opt/Alt + Drag: A more fluid way to duplicate. Hold the key and drag any clip to create an instant copy. It’s a single, elegant motion for repeating key audio elements or visual motifs.
Mastering these core premiere pro keyboard shietcuts is non-negotiable. It is the barrier between a clumsy operator and a fluid editor who can translate vision to timeline at the speed of thought. Burn them into your mind, and you will have laid the foundation for true editing mastery.
Assembling the Chaos: Shortcuts for the Rough Cut
This is where the magic begins. The first assembly is not about perfection; it’s a visceral, intuitive process of discovery. You are wrestling with the raw chaos of your footage to unearth the story’s true form. This stage is about speed, instinct, and broad strokes. The goal is to move fluidly, to let the narrative reveal itself without being bogged down by the interface. These foundational premiere pro keyboard shietcuts are your primary tools for turning a cold folder of clips into a living, breathing scene.
Marking and Selecting: The Language of Choice
Before a single clip hits your timeline, you must first claim your moments. This is the art of selection, of sifting through hours of footage to find the fragments of gold. These commands are the language you use to speak directly to the software, making your choices with speed and conviction.
- I and O: The fundamental act of editing. Setting In and Out points is how you declare where a moment begins and where it must end. This is your first and most important decision.
- M for Marker: Drop these like breadcrumbs. A marker is a note to your future self-a signpost for a moment of performance magic, a technical flaw, or a perfect story beat you can’t afford to lose.
- X to Mark Clip: A swift, decisive command. Instantly set In and Out points around the entirety of a selected clip in your source monitor or timeline. It’s a way of saying, “I want all of this.”
- D to Select Clip: Your playhead is your point of focus. This command instantly selects the clip directly beneath it, eliminating the need to hunt and click with the mouse.
Building the Sequence: The Art of Placement
Once your selects are marked, you must build the foundation of your edit. This is the architectural phase, where you lay down the bedrock of your narrative. Each placement is a statement, and how you place a clip fundamentally alters the rhythm and flow of the story.
- , (Comma) for Insert: This command respects the existing flow. It places your chosen clip onto the timeline and graciously pushes everything that follows it back, making space without destroying what’s already there.
- . (Period) for Overwrite: This is an act of conviction. An overwrite lays your clip down with authority, replacing whatever footage lies beneath it. Mastering both Insert and Overwrite is a rite of passage for any editor. While you can find hundreds of commands on Adobe’s official list of Premiere Pro shortcuts, these two form the bedrock of assembly speed.
- ; (Semicolon) and ‘ (Apostrophe): These are your sculpting tools. Lift (;) pulls a clip from the timeline, leaving a deliberate gap-a breath. Extract (‘) removes the clip and ripples the timeline closed, instantly tightening the pace.
Organizing Your Assets: Command Your Canvas
A master artist keeps their workspace clean. Your project panel and timeline are no different. Organization is not a chore; it is a discipline that frees your mind to focus on the creative. These essential premiere pro keyboard shietcuts help you maintain control over your digital domain.
- Cmd/Ctrl + I: The gateway. This is how you import your raw materials, inviting the footage, audio, and graphics into your project where the transformation can begin.
- Cmd/Ctrl + F: Your compass in the digital wilderness. In a project panel crowded with hundreds of assets, the Find command is your most direct path to the exact element you need.
- Shift + Del: The Ripple Delete. This is far more than a simple deletion. It’s a powerful, fluid motion that removes a selection and automatically closes the gap it leaves behind, healing your timeline and preserving its rhythm.
Refining the Harmony: Advanced Trimming & Fine-Tuning
The rough cut has a pulse, a raw energy that proves your story works. But the fine cut… the fine cut has a soul. This is the sacred space where precision and nuance are born, where you, the editor, manipulate time and rhythm with surgical accuracy. It’s where a sequence transforms from a simple collection of shots into a visceral, emotional experience. To command this level of artistry, you need tools that feel like an extension of your creative will. Mastering these advanced premiere pro keyboard shietcuts is the key to unlocking that power, elevating your edits from good to truly unforgettable.
The Art of the Trim
Trimming is not merely shortening a clip; it is the art of sculpting time. Each tool offers a unique way to shape the relationship between shots, defining the pace and emotional impact of every single cut.
- N for Roll Edit: Adjust the edit point between two adjacent clips simultaneously. Imagine pushing and pulling on the very fabric of time, extending one shot while retracting the other, all without altering the total length of your sequence.
- B for Ripple Edit: Trim the in or out point of a clip and watch the entire timeline automatically ripple to close the resulting gap. This is your tool for maintaining a seamless narrative flow, ensuring no dead air breaks the spell you are casting.
- Y for Slip Tool: Change a clip’s in and out points within its existing duration on the timeline. You are slipping the window of action forward or backward, searching for that perfect moment of performance or visual poetry without disturbing the clips around it.
- U for Slide Tool: Move an entire clip earlier or later on the timeline while simultaneously trimming the adjacent clips to accommodate its new position. This is how you orchestrate the placement of a key moment, sliding it into the perfect place in your rhythm.
Nudging and Audio Control
The difference between a good cut and a great one can be a single frame. These shortcuts give you the microscopic control needed to find perfection.
- Cmd/Ctrl + Arrow Keys: Nudge selected clips one frame at a time. This is the delicate touch required to align action, sync a sound effect, or perfect a reaction shot.
- Shift + Cmd/Ctrl + Arrow Keys: Nudge clips by five frames for larger, yet still precise, adjustments.
- G for Audio Gain: Instantly bring up the audio gain panel to adjust the volume of selected clips. Sound is 50% of your picture; this shortcut gives you immediate command over its emotional power.
Linking and Grouping
Maintain order amidst the creative chaos. These commands allow you to manage the complex relationship between the elements on your timeline.
- Cmd/Ctrl + L: Link and unlink video and audio tracks. Forge or sever the connection between sight and sound to create J-cuts, L-cuts, or to independently manipulate your visual and auditory layers.
- Cmd/Ctrl + G: Group disparate clips together, allowing you to move them as a single, cohesive unit. This is essential for managing complex sound design layers or intricate visual montages.
Ready to turn chaos into harmony? Explore the Cinemastery editing courses.
Forging Your Own Path: Customizing Your Keyboard
The default keyboard layout in Premiere Pro is a blueprint, not a temple. It’s a starting point given to the masses. But you are not the masses. True mastery, the kind that leads to a seamless flow state where the technology melts away, comes from shaping the tool to fit your hand, your mind, and your unique creative rhythm. This is how you stop operating software and start conducting an orchestra of edits. This is how you make Premiere Pro an extension of your artistic will.
Unlocking the Command Center
Your journey begins in the keyboard customization panel. To access this sanctum, navigate to Premiere Pro > Keyboard Shortcuts on a Mac, or Edit > Keyboard Shortcuts on Windows. Here, you’ll find a visual map of your keyboard, with keys color-coded to distinguish application-wide commands from panel-specific ones. The most potent tool here is the search bar; use it to hunt down any command, from “Add Edit” to “Slip Tool,” and see where-or if-it’s currently mapped.
The Philosophy of Flow
Randomly assigning keys is chaos. Smart customization is art. It’s here that your personal list of premiere pro keyboard shietcuts transforms from a generic guide into your command set. The goal is to build a layout where your fingers dance, never stumble. Follow these core principles:
- Create Proximity Clusters: Group related functions together. Place your Ripple, Roll, and Slip tool shortcuts around the J-K-L keys to create a powerful trimming nexus.
- Claim Prime Real Estate: Your most-used commands deserve the easiest-to-reach keys. Think Q, W, E, A, S, D. If you live by the “Add Edit” command, map it to a key your finger can find in the dark.
- Embrace Modifiers: Use Shift, Alt/Opt, and Cmd/Ctrl to multiply the power of a single key. The ‘C’ key might be your Razor Tool, but Shift+C could be “Enable/Disable Clip.”
- Be Ruthless: Don’t be afraid to overwrite default shortcuts you never use. That key is your canvas; paint it with the functions that serve your vision.
Codifying Your Creative DNA
Once you’ve sculpted the perfect layout, you must claim it. Use the “Save As…” option to name your custom preset. This immortalizes your workflow, ensuring it’s always available. You can also export this layout as a .kys file, a small packet of your creative essence that you can carry on a drive and load onto any machine, anywhere in the world. This creates absolute consistency, turning any edit bay into your home turf, where muscle memory is king and your focus remains unbroken on the story. This level of control over your premiere pro keyboard shietcuts is non-negotiable for the serious editor.
Master the Keys, Command the Narrative
You’ve seen that keyboard shortcuts are not mere tricks for speed; they are the language of creative flow, the very syntax of professional editing. By internalizing these commands-from the foundational to the custom-forged-you transform the timeline from a battleground of clicks into a canvas for your vision. This mastery over your premiere pro keyboard shietcuts is what separates a technician from a true storyteller, allowing your creative instincts to move at the speed of thought.
But technical fluency is only one part of the equation. The true art lies in what you choose to say. At Cinemastery Academy, we guide you beyond the tools to find your unique voice and signature style. Here, you learn from seasoned artists, not just technicians, within a curriculum built on the five core elements of film-the soul of cinematic language. Your future in film starts here. Master the craft at Cinemastery Academy.
The timeline awaits your command. Go forge harmony from chaos.
Frequently Asked Questions
What are the absolute most important shortcuts to learn first?
To begin your journey to mastery, focus on the commands that govern your timeline. Learn J, K, and L to dance through your footage. Master I and O to set your In and Out points with surgical precision. The V (Selection) and C (Razor) tools are your fundamental instruments for sculpting the edit. Finally, Q and W for Ripple Trimming will transform your rough assembly from a slow crawl into an intuitive, creative sprint. These are your foundational pillars.
How long does it take to get comfortable with Premiere Pro shortcuts?
True comfort is a process, not a destination. You will feel an immediate impact within your first editing session. In a week, the core commands will become instinct. Within a month, they will be an unconscious extension of your creative will, freeing your mind to focus solely on the story. Mastery is a lifelong pursuit, but fluency-the point where the tool disappears-is closer than you think. It’s about building muscle memory to translate vision into reality without hesitation.
Are the keyboard shortcuts different for Mac and Windows?
The soul of the shortcuts remains the same, but the primary modifier keys differ. Where a Mac artist uses the Command key, a Windows editor will use Control. Likewise, the Mac’s Option key is the Alt key in the Windows realm. Beyond this fundamental difference, the vast majority of the letter and function keys perform the exact same magic, allowing you to transition between systems with your creative momentum intact and your workflow unbroken.
Can I use another program’s (like Final Cut or Avid) shortcuts in Premiere Pro?
Yes. Adobe honors the muscle memory you have already forged. Premiere Pro allows you to adopt the keyboard layouts of other titans like Avid Media Composer or Final Cut Pro. You can access this by navigating to Keyboard Shortcuts and selecting a new layout from the preset dropdown menu. This empowers you to transition your skills seamlessly, using Premiere’s powerful engine without having to relearn the very language of your craft from scratch.
What’s the fastest way to find a shortcut for a specific command?
The Keyboard Shortcuts panel is your sacred text. Access it via Edit > Keyboard Shortcuts… and use the search bar to summon any command you can imagine. This visual map not only reveals the default key but allows you to see every assigned and unassigned command. It’s the ultimate way to demystify the vast landscape of premiere pro keyboard shortcuts and begin your quest to truly understand the instrument at your fingertips and bend it to your will.
Is it worth the time to create a custom keyboard layout?
Absolutely. A default layout is a starting point, but a custom layout is your signature. It is the difference between using a generic tool and wielding a bespoke instrument forged for your specific creative process. Investing the time to map your most-used commands to keys that feel natural to you is the single greatest step toward true editing velocity. Your custom set of premiere pro keyboard shortcuts will turn chaos into harmony at the speed of thought.